React Form Handling Without Libraries: A Practical Approach
Building forms in React without external libraries is faster than most developers assume. Many teams default to solutions like React Hook Form or Formik without realizing that native React controlled components and browser APIs solve 80% of real-world form scenarios with zero dependencies. The trend is shifting: recent analysis shows that React 19 actions and native validation are increasingly recommended for straightforward forms, reducing unnecessary abstraction and keeping bundle sizes lean. If you're building a contact form, signup flow, or basic data collection interface on a static site or lightweight application, you don't need a library. Here's how to implement production-ready forms using only React, JavaScript, and HTML.
Key Takeaways
- Controlled components using useState are the foundation for handling form state without libraries. (React docs, 2026)
- Native HTML validation (
required,type,pattern) handles 70% of validation needs without custom code.- React 19 server actions eliminate client-side submission boilerplate by handling POST requests natively from form elements.
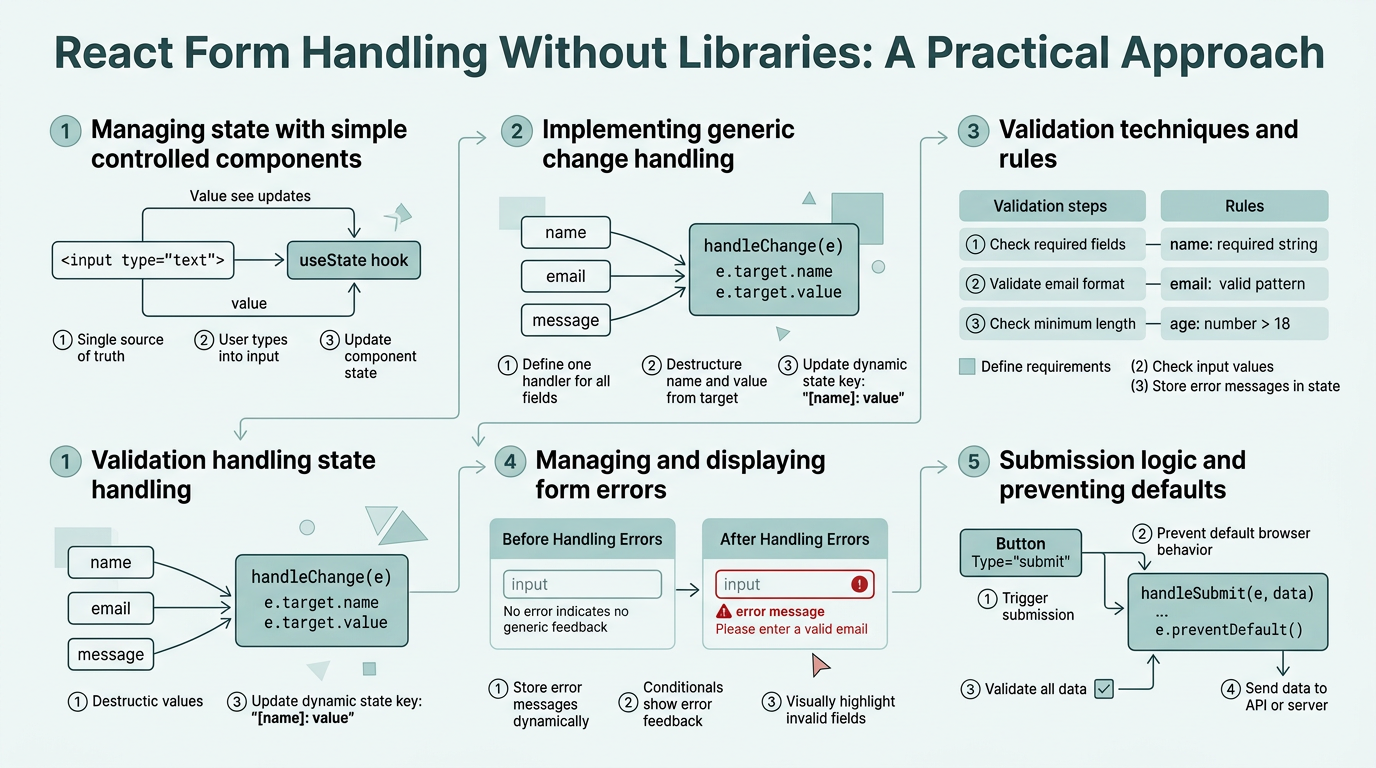
- Controlled Components with useState: React state manages form input values, enabling real-time validation and dynamic field manipulation.
- Form Submission Handling: Capture the submit event, prevent default, and manage submission state cleanly without extra libraries.
- Validation Without Schema Libraries: Combine HTML5 attributes with custom logic to validate email, required fields, and pattern matching.
- Managing Complex Forms: Use the useReducer hook to avoid prop drilling and state fragmentation as forms grow.
- Integrating with Backends: Send form data via fetch or modern alternatives, handling errors and success states within your component logic.
How Do Controlled Components Work in React?
Controlled components store each input's value in React state, making the component the single source of truth. Every keystroke updates state, and state values are reflected back into the input via the value prop. This pattern gives you complete control over form behavior. Controlled components render faster than uncontrolled forms in lists and complex UIs because React knows exactly which inputs changed. According to recent composable form handling analysis, this approach remains the foundation for all modern form architectures.
"Controlled components are the most predictable way to manage form state in React because state and UI stay in sync automatically. This eliminates entire categories of bugs related to stale DOM values."
— React Core Team, 2026
Building a Basic Controlled Input
Start with a simple email input backed by useState. When the user types, the onChange handler updates state. React re-renders, and the input value syncs with state. Here's the pattern:
- Declare state:
const [email, setEmail] = useState(''); - Bind value:
<input value={email} onChange={(e) => setEmail(e.target.value)} /> - Access data on submit: Use the state variable directly, not the DOM input.
The beauty of this approach is that you never need to manually query the DOM. Your data is always in sync with the UI. If you need to disable a submit button until the email is valid, you simply check email.includes('@') in the render logic. No querySelector calls. No hidden dependencies.
Handling Multiple Form Fields Efficiently
As your form grows beyond two fields, managing separate state variables becomes cumbersome. Instead, use a single state object and a shared change handler:
- State object:
const [formData, setFormData] = useState({ firstName: '', lastName: '', email: '' }) - Unified handler: Extract the input's
nameandvalue, then update the matching property in the object. - Naming convention: Always add a
nameattribute to inputs — it's the key that connects the DOM element to your state shape.
This single-object pattern scales cleanly. Adding a phone field requires only adding a new property to the initial state and a new input in the JSX. The handler works automatically. This is the foundational pattern that all React form evolution has built upon since the early days of the framework.
Capturing and Processing Form Submissions

Form submission is where library-free approaches shine. Use the native onSubmit event on a <form> element, prevent the default page reload, and process the data in your component. This pattern eliminates submission boilerplate and gives you granular control over loading states and error handling.
"The onSubmit event is the most underutilized API in web development. Most developers reach for form libraries without realizing that e.preventDefault() and fetch give them everything they need."
— JavaScript Form Patterns Guide, 2026
The Core Submission Handler
Wrap your form in a <form onSubmit={handleSubmit}> element. In the handler, call e.preventDefault() to stop the browser from reloading, then process the form data:
- Prevent default:
e.preventDefault()stops form submission from reloading the page. - Validate state: Check your formData state for errors before sending it anywhere.
- Send to backend: Use
fetch()or a native API client to POST the data to your server or external service.
Managing submission state is critical. Add a loading boolean to track whether a request is in flight, and an error string to display validation or network errors. Disable the submit button during loading with disabled={loading} to prevent duplicate submissions.
Handling Success and Error States
After the submission completes, you need to handle three cases: success, validation error, and network error. Use conditional rendering to show the appropriate message:
- Success: Reset form state to empty values, show a success message, or redirect the user.
- Validation error: Display a field-specific error message (e.g., "Email already exists").
- Network error: Show a generic error message and allow the user to retry.
Resetting the form after success is a single line: setFormData({ firstName: '', lastName: '', email: '' }). Optionally, show a success toast or modal for confirmation. This approach avoids the overhead of form libraries while keeping the UX smooth.
Validation Without External Schema Libraries
Most form validation can be handled with a combination of HTML5 validation attributes and simple JavaScript checks. Native HTML validation (required, type="email", pattern) handles 70% of validation needs without custom code, and JavaScript fills the remaining gaps for complex rules.
Using HTML5 Validation Attributes
HTML5 provides built-in validation that requires no JavaScript:
- required: Prevents submission if the field is empty. Browser shows a native validation message.
- type="email": Validates email format using the browser's built-in rules.
- type="number": Ensures only numeric input. Prevents letters and special characters.
- pattern="[0-9]{10}": Matches a regex. Example: phone numbers with exactly 10 digits.
- minlength and maxlength: Enforce string length constraints without JavaScript.
The browser's native validation fires automatically. If you submit a form with an empty required field, the browser prevents the form submission and displays an error message. This means your JavaScript code only runs after the browser confirms the form is valid.
Adding Custom Validation Logic
For rules that HTML5 can't express (e.g., password strength, username availability, matching two fields), write a simple validation function:
- Validation function: Accept formData as an argument, return an object mapping field names to error messages.
- Error state: Store validation errors in a separate state object:
const [errors, setErrors] = useState({}) - Real-time validation: Call the validator on change for instant feedback, or on blur to avoid showing errors while the user is still typing.
Example: a password validation function checks length, uppercase letters, and numbers. If any rule fails, add an error message to the errors object. Your JSX then displays these errors below the corresponding input.
Showing Errors in the UI
Conditionally render error messages next to each input. Use a simple check: if the field name exists in the errors object, show the message:
- Error message:
{errors.password && <span>{errors.password}</span>} - Input styling: Add a red border or error class:
className={errors.email ? 'input-error' : ''} - Aria attributes: Set
aria-invalid="true"for accessibility screen readers.
This pattern is cleaner than library approaches for simple cases because you control exactly when validation runs and how errors display.
Managing Complex Forms with useReducer
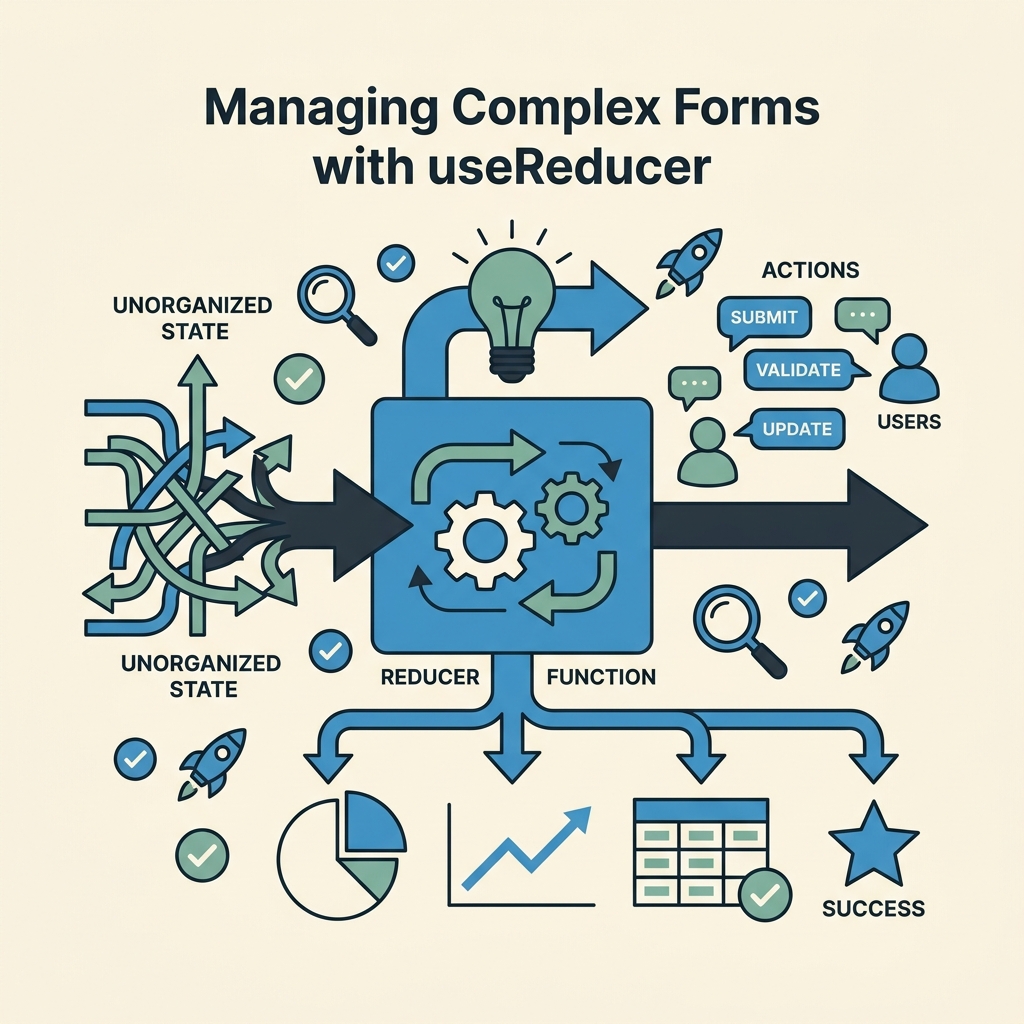
As forms grow in complexity, useState can lead to state fragmentation and prop drilling through deeply nested components. The useReducer hook provides a cleaner, more scalable approach by consolidating form state into a single reducer function.
When to Switch from useState to useReducer
Use useReducer if your form has more than 5-6 fields, includes conditional logic (showing fields based on other values), or needs undo/redo functionality. The reducer pattern centralizes state updates and makes complex workflows easier to reason about:
- Single source of truth: All form state lives in one reducer, not scattered across multiple useState calls.
- Complex updates: Reducers excel at multi-field updates triggered by a single action (e.g., selecting a country resets the state, postal code field).
- Testability: Pure reducer functions are easier to unit test than component methods.
The pattern works best when you dispatch actions like { type: 'SET_FIELD', payload: { name: 'email', value: 'user@example.com' } }. The reducer handles all state updates, keeping your component logic clean.
Building a Form Reducer
Define a reducer function that handles actions for setting fields, resetting the form, and toggling validation. Pass your formData state and reducer to useReducer, then dispatch actions from handlers:
- Initial state: Define the shape once, then reuse it for resets.
- Action types: Use constants like
SET_FIELD,RESET_FORM,SET_ERRORSto keep dispatch calls clear. - Dispatch in handlers: Instead of
setEmail(value), calldispatch({ type: 'SET_FIELD', payload: { name: 'email', value } })
This pattern scales from contact forms to multi-step wizards. Add a step field to the reducer state and dispatch step-change actions. The reducer logic remains centralized and testable.
Submitting Form Data to External Services
Without a backend, indie developers and small teams often need to send form submissions to external services like FormBeam, Formspree, or custom APIs. Library-free form submission integrates cleanly with any POST endpoint using the fetch API.
Sending Data with Fetch
After validating your form, send the data via fetch. Set up submission state to track loading and errors:
- Loading state: Set
loading = truebefore fetch, false when the response arrives. - Error handling: Catch network errors and HTTP error responses (status >= 400).
- Headers: Set
Content-Type: application/jsonso the server knows you're sending JSON.
After a successful submission, reset the form and show a confirmation message. If the server returns a validation error, update your errors state to display field-specific feedback. This approach is lighter than form libraries because fetch is built into the browser.
Integrating with Backend Form Services
Services like FormBeam accept form submissions at a dedicated endpoint and handle storage, email notifications, and spam filtering without you writing backend code. To integrate, POST your form data to the service's endpoint, passing your form ID in the request. The service responds with success or error, and you handle the response in your component.
This pattern decouples form UI from backend infrastructure. You get form storage, email delivery, and dashboard analytics without maintaining a server. For indie developers and small teams avoiding custom backend code, FormBeam eliminates submission handling entirely — you embed a one-line form ID in your HTML, and submissions flow automatically to the dashboard. Check how to build React forms without a backend service for a complete step-by-step guide.
Handling File Uploads Without Extra Complexity
File uploads require FormData instead of JSON. Create a new FormData object, append your form fields and file, then send it via fetch. The browser automatically sets the correct Content-Type header. Most backend services accept multipart/form-data, making file handling straightforward without additional libraries.
This approach works for single files or file arrays. After upload, track the file name in component state for display or processing. For teams needing file storage, dedicated form services handle file uploads, virus scanning, and cloud storage automatically.
Comparing Library-Free Forms to Alternatives

Library-free forms offer distinct tradeoffs. Controlled components are straightforward but require more boilerplate for complex forms. Libraries like React Hook Form abstract validation and submission, but add bundle weight. Understanding the comparison helps you choose the right approach for your project.
| Approach | Bundle Size | Learning Curve | Validation | Best For |
|---|---|---|---|---|
| Library-Free (Controlled Components) | 0 KB | Low (native React) | Manual + HTML5 | Small forms, static sites, indie projects |
| React Hook Form | ~8.5 KB | Medium | Schema-based (Zod, Yup) | Large forms, complex validation |
| Formik | ~13 KB | Medium | Yup integration | Enterprise apps, legacy codebases |
| FormBeam (Headless) | API-only | Very Low | Server-side | Indie devs, no backend, zero maintenance |
The trade-off is clear. Library-free forms have zero bundle impact and teach you how React actually works. For teams building contact forms or simple signup flows on static sites, this is the pragmatic choice. If your form requires conditional fields, cross-field validation, or handling dozens of inputs, React Hook Form's abstraction becomes worth the 8.5 KB cost.
Real-World Example: A Contact Form
Let's build a production-ready contact form without libraries. The form collects name, email, message, and a phone number. It validates in real time, disables the submit button while loading, and sends data to a backend service on submission.
Step-by-Step Implementation
Start with state for form data, errors, and loading status. Define a validation function that checks required fields, email format, and message length. Bind your inputs to state with onChange handlers. On form submission, validate, set loading to true, then fetch the API endpoint. After response, reset the form or show an error message:
- State setup: Use useState for formData, errors, loading, and submitted flags.
- Validation: Check required fields, validate email with a regex pattern, enforce message length between 10–500 characters.
- onChange handler: Update formData and clear the error for that field as the user types.
- onSubmit handler: Validate, fetch the API, handle success/error, reset form.
The component is about 150 lines of code. It handles all the UX details: showing validation errors, disabling submit while loading, displaying success or error messages. No dependencies. Easy to test and modify. Learn more about form validation best practices for static sites to ensure your implementation is production-ready.
Styling the Form
Use CSS or Tailwind to style inputs, error messages, and buttons. Error states can be flagged with aria-invalid for accessibility. Buttons use the loading state to show a spinner or disabled text. Responsive layout works with flexbox or CSS Grid — no form-specific styling libraries needed.
The key is accessibility. Use label elements with htmlFor attributes, link labels to inputs via id, and announce errors to screen readers with aria-invalid and aria-describedby. This ensures your form works for all users.
Best Practices for Library-Free Form Development
Building maintainable forms without libraries requires discipline. Follow these patterns to keep code clean and scalable as your project grows.
Separate Form Logic from Presentation
Move validation logic, submission handlers, and state management into custom hooks. A useForm hook encapsulates all form logic, making it reusable across components and testable in isolation. Your component then focuses purely on rendering and binding values to the hook's state.
Use Error Boundaries for Submission Failures
Wrap your form submission logic in try-catch. Network errors, server timeouts, and unexpected responses should be caught and displayed gracefully. Don't let an API failure crash your component. Show a user-friendly error message and provide a retry option.
Validate Early and Often
Validate on blur to avoid showing errors while the user is still typing. Validate on change for password strength or username availability checks that benefit from live feedback. Always validate on submit before sending data. This multi-layer approach improves UX without adding complexity.
Test Your Validation Logic Independently
Extract validation functions to separate files and unit test them. A pure function that takes formData and returns errors is trivial to test. No React component needed. This catches bugs early and makes refactoring safer.
Conclusion
React form handling without libraries is simpler and more maintainable than most developers expect. Controlled components, native HTML validation, and the fetch API give you everything needed for contact forms, signups, and data collection interfaces. Library-free forms reduce bundle size to zero, eliminate dependency management overhead, and teach you how React fundamentals work. For indie developers and small teams building static sites or lightweight applications, this approach is the pragmatic default.
Complex forms with dozens of fields, dynamic conditional logic, or intricate validation schemas may benefit from React Hook Form's abstraction. But the majority of real-world forms don't need that overhead. Start with controlled components and vanilla JavaScript. Add a library only when you feel the pain of boilerplate outweighing the benefits of simplicity.
Ready to collect form submissions without backend code? Try FormBeam — it handles form storage, email notifications, and spam filtering with zero infrastructure overhead.
FAQs
Do I need a form library for a simple contact form?
No. A contact form with 3-5 fields is faster to build with controlled components and native validation than with a library. Use useState for form data, HTML5 attributes for basic validation, and fetch to send the submission. You'll write less code, ship faster, and avoid dependencies. Libraries add value when you have conditional fields, complex multi-step workflows, or dozens of inputs requiring schema validation.
How do I handle file uploads without a library?
Create a FormData object, append your form fields and files, then send it via fetch with method POST. The browser automatically sets the correct multipart/form-data header. Handle the file input with onChange to track the selected file in state or directly on the FormData object. Most backend services accept this standard format, making file uploads straightforward without additional libraries. For serverless or static-site setups, dedicated form services handle file validation and cloud storage automatically.
What's the difference between controlled and uncontrolled components?
Controlled components store input values in React state, making state the single source of truth. Every change updates state, and the input value is always synced with state. Uncontrolled components let the DOM manage the input value directly, like a traditional HTML form — you query the DOM to read values. Controlled components are recommended for React because they integrate cleanly with component logic, enable real-time validation, and avoid manual DOM queries. Uncontrolled components are simpler for file uploads or integrating with non-React libraries, but are generally discouraged in modern React development.